Reverse SSO: Logging Into Your Site After Checkout
 If you are asking the FoxyShop datafeed endpoint to create user accounts on your site, you can customize the receipt to automatically log the user in to your WordPress site. This means that by the time they get back to your site their account will already have been created and they will be logged in. In order to utilize this feature, please see the following requirements:
- Must be using FoxyCart 2.0+
- Must be using FoxyShop 4.6+
- Must have SSO enabled
- The datafeed should be pointed to FoxyShop
- “Create/Update WordPress User After Checkout” should be checked in FoxyShop Settings
Upgrading to FoxyCart 2.0
It seems like FoxyCart has been working on version 2.0 forever — well it almost has been forever. But their hard work has paid off and it’s almost ready for release. It’s been in public beta for a couple of months and it is now solid enough to install on most sites. In this post, I’ll describe some key features and some of the things that you’ll want to look out for when upgrading.
Before You Start
2.0 is still in beta. It’s getting very solid, but you may encounter some rough edges so be aware of that. If you do run into issues, you will want to email FoxyCart support.
Once you upgrade, you can’t go back to 1.1. So either create a test store, or be sure you really want to do this. When upgrading, keep in mind that your old templates will be blown away so if you had custom scripts, those should be safely downloaded first. If you have custom wording in your email template, be sure to save it first.
I recommend using FoxyCart’s default responsive checkout. It looks very nice and modern and is fully mobile-friendly. If you still want to skin the checkout to match your header and footer and fonts/colors, you’ll definitely want a test store so you can spend some time playing with it.
Prepare a file with your site’s logo. It should be wider than it is tall and 280px wide. Bonus points if it’s a transparent PNG. Upload this to your site and keep the url handy.
Upgrade FoxyShop to at least version 4.5.
Does your store use Colorbox for gallery image popups? If so, you will want to be ready to either switch to PrettyPhoto or load the ColorBox files on the site yourself. The new version of FoxyCart does not use ColorBox but instead a brand new modal overlay that has been custom-developed by FoxyCart called Sidecart.
The FoxyCart 2.0 documentation is available here: https://wiki.foxycart.com/v/2.0/start. Pay special attention to the changes in the templating and cart js sections. If you had old code that worked with the fcc object or with ColorBox it won’t work any longer.
Taking the Plunge: Upgrading
In the FoxyCart admin on your Store Settings page, put your new image logo in the “Logo URL” box and upgrade to 2.0. Then go to the FoxyShop settings and update your store to be FoxyCart Version 2.0. Now, go to your site and try to add something to the cart. Does Sidecart pop up? If not, open up your console and look for Javascript errors. You’ll also want to look at your FoxyCart includes and make sure they are pulling down the correct Sidecart includes and responsive_styles.css.
Go back to the FoxyCart admin and click on the new “Configuration” menu item under the templates section. Most of this is very self-explanatory. I do recommend clicking on “Customize Cart Display” and unchecking all but the first “Show Product Options.” You may also be interested in customizing what checkout fields are shown and what countries are allowed to check out. This used to be a script but it’s now built-in.
There are new versions of the shipping scripts which are required. If you need these and can’t find them in the wiki, contact FoxyCart support. If you want to add special fields to the checkout, the code can be entered right in the injection section.
Step-by-Step Guide for Nonprofits
This is the moment you’ve been waiting for. Setting up your own donation page!
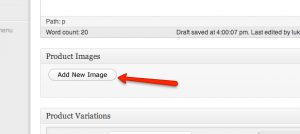
Within the FoxyShop plugin, click on Add New Product. Set the base price to 0 and remove the quantity and weight fields.
You’ll also want to add an image for your product.

The goal here is to get a super flexible donation page which will allow your constituents to pick a specific donation amount, specify a custom amount, and decide if they want to give a one-time gift or a recurring gift.
For this product, check the two checkboxes to “Force Immediate Checkout” and “Empty Cart Before Adding Product” as shown below since we won’t really need the modal cart functionality.
To get the donation page functionality we need, we’ll need to set up some specific product variations.
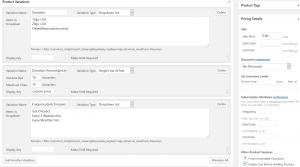
Create a product variation called “Donation” of variation type “Radio Buttons” with the following data:
$5{p:5}
$10{p:10}
$25{p:25}
$100{p:100}
Other{dkey:custom-price}
Next, create a “Single Line of Text” variant named “Donation Amount{price}” and set the “Display Key” to “custom-price”
Finally, create a “Drop Down List” variant named “Frequency{sub_frequency}” with these values:
Just Once{v:}
Every 2 Weeks{v:2w}
Every Month{v:1m}
Save the page. To add a link to this page in your menu, create a new page in WordPress of format “link” and point it to the url of your products.
If you’re using the Other donation amount, this setup will add the correct amount to the cart, but won’t dynamically update the price on the page. To do that, you’ll need to apply a script to the page, just before the closing </body> tag. You can grab the code here. If you need assistance on how to do this, contact us here.
Disclaimer
Demo: Building Checkout Templates
 Update: As of version 4.4, there’s now an easier way to build checkout templates. See the docs for more info.
Ever wanted to customize your FoxyCart checkout so that it looks just like your website? I get this question a lot so I’ve put together a demo video explaining how to build a WordPress template that will work as a checkout template.
Resources:
Self-Hosting Your Download Files
 FoxyCart supports downloadable items, but they only offer 100MB of download space for free and you have to store the files with them. If you have a lot of files you need to offer, you’d want a way to self-host your downloadables.There is a script at the FoxyCart wiki which helps you setup a self-hosted download, but it is a little involved and takes some integration to work directly with FoxyShop.
The guys at FoxyCart are planning to add native self-hosting in the future so I’ve been reluctant to build in any official support for self-hosting files as it is a little hacky. But if you need to build a site now, here’s a guide on how to do it. Note that setting this up requires a moderate level of PHP proficiency. If you aren’t comfortable working with PHP you may get a little disoriented. (continue reading…)
FoxyShop Starter Theme for Twenty Eleven
 If you’ve tried to install FoxyShop with Twenty Eleven (the current default theme for WordPress) you already know that things look a little wonky. It’s not terrible, but the margins are off and everything just takes some tweaking before it looks right.
To help you get started faster, I’ve put together a starter theme that you can use as a child theme for Twenty Eleven. Or, you can just grab the header and footer files and chuck the css into your existing stylesheet. Either way, this should save you at least an hour getting Twenty Eleven and FoxyShop to play nicely.
Dec 2011 UPDATE: Theme updated on December 19, 2011 to add z-index: 1; to #branding. TwentyEleven 1.3 changed this so that the header was floating over top of the cart modal.
Jan 2012 UPDATE: The downloadable version has this included, but as of version 3.9, you will want to change line 8 of the included foxyshop.css file from #foxyshop_container #content to .foxyshop #content since moving the #foxyshop_container inside the header includes affected this theme. This only applies if you are running a version of this theme you previously downloaded.
April 2012 UPDATE: I’ve made some responsive updates to this theme so that it will scale better at lower resolutions. These changes are at the bottom of foxyshop.css if you’d like to upgrade your existing theme.
Tutorial: Color Swatches
 If you’ve ever wanted to have color swatches with your theme, here’s a guide and some sample code to turn this feature on. This method allows you to set HTML color codes and/or set color swatches for each color. Then it looks for any variation called “Color” and turns it into a clickable color swatch list. If you set ikeys, the main image will change also!
Tutorial: Pricing Based on Inventory
 FoxyShop was developed to be extremely flexible so that developers could do anything they needed to with the product structure. Recently I had someone come to me looking to charge different amounts based on the inventory level. It was an interesting challenge and I want to share it with you the results as a guide for your own “extreme” customizations.
Take a look at the source code.
This particular product needed to charge $5 if there were 100 tickets available, $10 if there were under 90, $20 if there under 60, and $25 for the last 20 tickets. I put the source code from the link above in my functions.php file and then setup the new Price Levels field with the syntax as you see in the image at right. This new field is added by the custom code – you can add any fields you want with this hook.
 The specialized code uses hooks to tie into the core FoxyShop functionality. In this case, we’re checking for the new custom field and if it is set, we’re looking at the current inventory and adjusting the price. This happens deep within the FoxyShop process so it will be applied anywhere FoxyShop grabs the price. It also ignores this functionality if the customized price field isn’t set. Of course, you’ll have to set the inventory for this particular product code.
While you may not need this exact feature, this guide can serve as a helpful starting point for your own customization with examples of how to tie into FoxyShop’s core. As always, if you need a hook or filter added to the core for some functionality I haven’t yet thought of, please let me know. I’m here to help!
How To Build Custom Price Fields
Note: This page was updated on November 21, 2017. The previous approach outlined here is no longer necessary for creating a custom price field. Comments may refer to the previous article, but we are leaving here for future reference. If you have any questions, please contact us here.
Please see this article for instructions on how to create a field that allows a dropdown plus “Other” for custom donation entry.
Easy Mailchimp Integration
 I worked up a quick tutorial to demonstrate how easy it is to add customers to a MailChimp list during the checkout process.
1. Go to Mailchimp and login to your account. Go to the Account button dropdown and select “API Keys & Authorized Apps”. If you don’t have one yet, create a new API Key and make a note of it. Next, click on the Lists button. Find the list to which you’d like to add customers and hold your mouse over the settings dropdown. Select “list settings and unique id” and scroll to the bottom of the page. Make a note of the unique ID for this list.
2. Get the code at http://pastebin.com/gfqjPQHv and paste it into the foxyshop-datafeed-endpoint.php file in your template folder. If you don’t have one in your template folder, grab the one from plugins/foxyshop/themefiles and copy it there. Paste the code after the line that says “//If you have custom code to run for each order, put it here“. Replace the x’s with your API key and list ID. If your list doesn’t use FNAME and LNAME, you’ll want to adjust the Merge Vars as well, but all lists come with those fields by default. If you haven’t changed anything on your list, you don’t have to worry about it. You can add address fields and populate those as well if you’d like. Just make sure you add the corresponding fields to your MailChimp list.
3. Download this file, unzip it, and put it in your theme directory. If you are using a child theme, put it in your child theme directory.
4. Go to your FoxyCart admin, click on Templates / Checkout, and paste this code at the bottom of your template. Note: if you are using FoxyCart 2.0+, skip this step and just turn on the “Let Your Users Signup For Your Newsletter” feature in your FoxyCart admin (configuration section).
5. If you aren’t already using it, make sure you turn on the FoxyCart datafeed (Store / Advanced). You can find your datafeed url in your FoxyShop settings page.
6. Test!