Step-by-Step Guide for Nonprofits
This is the moment you’ve been waiting for. Setting up your own donation page!
Within the FoxyShop plugin, click on Add New Product. Set the base price to 0 and remove the quantity and weight fields.
You’ll also want to add an image for your product.

The goal here is to get a super flexible donation page which will allow your constituents to pick a specific donation amount, specify a custom amount, and decide if they want to give a one-time gift or a recurring gift.
For this product, check the two checkboxes to “Force Immediate Checkout” and “Empty Cart Before Adding Product” as shown below since we won’t really need the modal cart functionality.
To get the donation page functionality we need, we’ll need to set up some specific product variations.
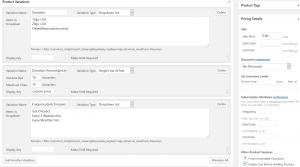
Create a product variation called “Donation” of variation type “Radio Buttons” with the following data:
$5{p:5}
$10{p:10}
$25{p:25}
$100{p:100}
Other{dkey:custom-price}
Next, create a “Single Line of Text” variant named “Donation Amount{price}” and set the “Display Key” to “custom-price”
Finally, create a “Drop Down List” variant named “Frequency{sub_frequency}” with these values:
Just Once{v:}
Every 2 Weeks{v:2w}
Every Month{v:1m}
Save the page. To add a link to this page in your menu, create a new page in WordPress of format “link” and point it to the url of your products.
If you’re using the Other donation amount, this setup will add the correct amount to the cart, but won’t dynamically update the price on the page. To do that, you’ll need to apply a script to the page, just before the closing </body> tag. You can grab the code here. If you need assistance on how to do this, contact us here.
Disclaimer
2 Responses to Step-by-Step Guide for Nonprofits